eggless Rasmalai cake
Ras malai or rossomalai is a dessert originating from the Bengal region of the Indian subcontinent. The name ras malai is the Hindi cognate which comes from two words in Bengali: rosh, meaning "juice", and malai, meaning "cream". It has been described as "a rich cheesecake without a crust".
Ras malai consists of white, cream, or yellow coloured flattened balls of chhana soaked in malai (clotted cream) flavoured with cardamom. The balls are cooked in sugar syrup and milk with saffron, pistachios and kheer as stuffing. Homemade ras malai is usually made from powdered milk, all-purpose flour, baking powder and oil, which are kneaded to form a dough, moulded into balls, and dropped into simmering milk cream.
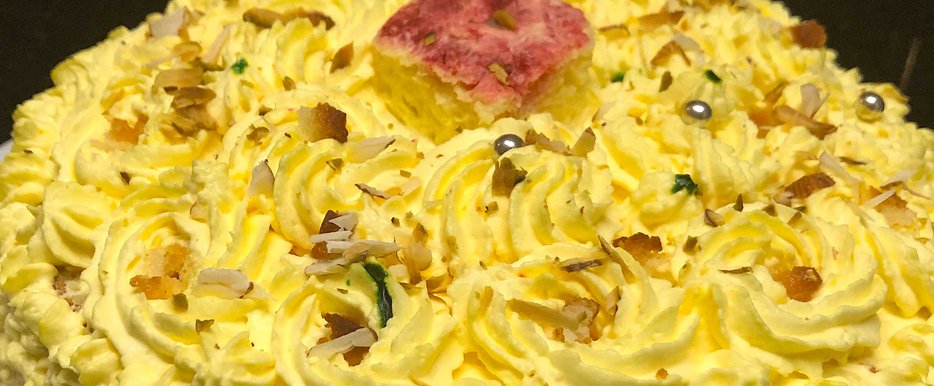
Rasmalai cake is a rasmalai flavoured cake, in which layers of the cake are soaked in ras from the rasmalai and frosted with ras infused whipped cream, decorated with some nuts like pistachios, almonds etc and with some dried rose petals (optional). You may use the nuts as per your taste and as per the availability.
Eggless Rasmalai Cake is a cake infused with the flavours of Rasmalai (an Indian Sweet). It is a fusion cake or dessert prepared with a basic western sponge cake with some exotic traditional Indian (Bengali) sweet Ras Malai.
The dessert or sweet Ras Malai itself is divine and once it is incorporated into a sponge cake this dessert becomes an ultimate treat for those who have a sweet tooth.
I tried this cake firstly on my husband's birthday occasion to give him a surprise and he loved it very much. I wanted to bake this since long and got chance on his birthday.
Actually I started baking cakes/cookies, as here we don't find any eggless cakes and my husband is vegetarian, he don't eat eggs, so I started baking as I feel birthdays and anniversaries are incomplete without a lovely cake. This time I was completely satisfied with the result.
I followed many food groups and they inspired me a lot, I love to try different things and this cake is one of the example. Although it takes a lot of time and efforts to bake this cake or any such cakes, but the efforts paid off truely and complete when you can make someone happy on his/her special day.
I also made the Rasmalai at home but you can buy them from any Indian sweet shop.
 Recipe Servings: 8
 Cooking time: 60 Minutes
Ingredients
For Cake Base
- All purpose flour (Maida) - 1.5 cups
- Unsalted Butter - 1/2 cup
- Yogurt (Curd/Dahi) - 1/2 cup
- Powdered Sugar - 1 cup
- Milk - 1/2 cup
- Baking Powder - 1.5 tsp
- Baking Soda - 1/4 tsp
- Salt - 1/4 tsp
- Cardamom Powder - 1/4 tsp
- Almond Extract - 1/4 tsp
For Whipped Cream
- High Fat Milk (35 % fat) - 3 cups
- Sweetened Thickened Milk from the Rasmalai - 2 tbsp
- Icing Sugar - 6 tbsp
- Almond Extract - 1/4 tsp
- Yellow Food Colour - as required (optional)
For Assembling the Cake & Garnishing
- Sweetened Thickened Milk from the Rasmalai (to brush the cake layers) - 1/3 cup
- Rasmalai's - as required
- Pistachios (Sliced) - as required
- Almonds (Sliced) - as required
- Dried Rose Petals - as required (optional)
- Red Colour (to colour the Rasmalai) - as required (optional)

Preparation
For the Cake
- Preheat the oven to 180 º C/ 355 ºF and position a rack in the middle of the oven. Preheat it for approximately 15 minutes.
- Grease a round 7" cake tin or cake mould with some butter and dust it with some all purpose flour (maida) to coat the cake tin/cake mould. You can also use parchment paper so that the cake won't stick to the bottom of the mould/cake tin.
- Sieve 1.5 cups of all purpose flour (maida), cardamom powder, baking soda and baking powder in a mixing bowl.
- Then add salt, mix all the dry ingredients until combined properly. Keep them aside for later use.
- Beat the butter and the sugar on medium-high speed until light and creamy, in the bowl of a stand mixer fitted with the paddle attachment. Scrap down in between, so that everything gets mixed properly. It should take approximately 2-3 minutes to get this done. You can also use an electric hand mixer/beater to do this step.
- Once done, add the yogurt (curd/dahi) and continue beating on a medium-high speed.
- Then put some almond extract into the mixture and beat it again on a medium speed for another 30 seconds.
- Then reduce to the lowest possible speed and add alternately already mixed dry ingredients and milk. Start with adding the dry ingredients first and also end this process with the dry ingredients.
- Transfer this batter to the already prepared cake tin/cake mould. Give the tin/mould a gentle tap so that the air bubbles come out.
- Bake the cake on the middle rack for approximately 45-50 minutes or until the toothpick inserted in the centre of the cake comes out clean. Keep an eye on the cake when it's getting baked.
- Once baked, cool the cake on a rack in the tin/mould for approximately 10 minutes.
- Now take out the cake from the cake tin/cake mould and let it cool completely. You can trim the edges with a serrated knife to even out.
- Once the cake gets completely cooled, cut the cake into 3 layers or 2 layers (as per the layers you want to have in your cake), with the help of a long serrated knife. Keep in mind, cut the cake into layers only once it gets completely cooled.
For the Whipped Cream
- Add in the bowl of the stand mixer fitted with the whisk attachment, high fat milk, almond extract, icing sugar, ras/milk from the rasmalai and few drops of yellow food colour. Use the drops as per the colour you want to have on the cake cream.
- Whip the cream on a low speed to incorporate the sugar well and then increase the speed to medium-high and beat until it forms stiff peaks. It's important not to over-beat or else it will turn into butter.
- To check if your cream is ready is by inverting the bowl if the cream stays intact without showing signs of slipping from the bowl, it's done. Keep the whipped cream in the refrigerator until you are ready to frost the cake.
Assembling and Decorating the cake
- Spread a little-whipped cream on a cake stand and put the first layer of sponge cake above it.
- Use a spoon and pour some thick milk (ras) of rasmalai.
- Now spread little-whipped cream evenly on the sponge then arrange some slices of the paneer balls (Rasmalai) over it. You may also put some crumbles of the rasmalai pieces instead of the slices of the rasmamai.
- Then apply a thick coat of whipped cream evenly and smooth it with the spatula.
- Repeat the same with the second layer of the cake.
- Now place the last cake layer, and coat the cake with a rough ras malai crumb coating. Refrigerate it for about 30 minutes.
- Apply more whipped cream all over the cake and smooth out the edges.
- Transfer the remaining cream into a piping bag fitted with a nozzle as per the design you want to have on your rasmalai cake. Pipe out the cream to form rosettes or any other design.
- Place some slivered pistachios, almond slices and dried rose petals (optional) all over the sides.
- Squeeze out the ras from few rasmalais and then cut them into small pieces with the designs like heart shape, circular or whichever shape you want to have. Place it in the centre of the cake. You can use your own creativity and make any design you wish.
- You may also use edible colours like red, green etc. to give colour to rasmalai and give some contrast to the whole cake.
- Sprinkle some of the pistachios slices, almond slices and/or dried rose petals on the top of the cake. Refrigerate the cake for 2-3 hours before serving.
- Enjoy yummy rasmalai cake with your loved ones.
